Thursday, December 17, 2009

Madden 10 game plan (Part 2 - Defense)

I use the New York Jets playbook on defense because of its versatility. The 49ers are best suited for the 3-4 formation but there are times when the 46 formation is desirable. At the beginning of a game, I'll start out "Asking Madden". Actually, I'll use "Ask Madden" on defense throughout the game unless I learn my opponents tendencies.

cb-dogs-blitzPlay Action Passes - If my opponent likes to abuse the play action pass I'll use CB Dogs Blitz out of 3-4 formation (cover 2) or CB Dogs Blitz (cover 3) out of Nickle 3-3-5 formation. I've noticed that these plays seemed to have responded better before patch #2 came out. After Patch #2, I've noticed the corner backs biting on the play action pass.

rush-outside-qb-containWildcat - I use the Rush Outside play out of 46 Normal formation. I'll spread the linemen and then put the safety in QB Spy and user him. This play seems to always be effective against the wildcat for the most part. For pass plays out of the Wildcat QB Contain from 3-4 Normal formation will work.

Nano Blitzes
I'm not certain if I'm setting these up properly but every once in a while I'll try some nano blitzes that I've found on the internet.
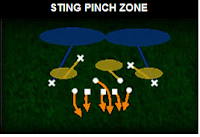
sting-pinch-zoneSting Pinch Zone - In the Sting Pinch Zone out of the 3-4 over formation I reblitz the DT and the blitzing linebacker. I also turn 'Show Blitz' on so the linebacker comes closer to the line. I user one of the Defensive ends. The Sting Pinch is supposed to bring more pressure but it's a risky play because there's no deep coverage.

ss-snake-3-staySS Snake 3 Stay - The only adjustment needed in this play is to use "show Blitz" so the SS will come in closer before the snap. I'd probably get more nano pressure from this play if I were to put in a faster strong safety. The 49ers strong safety, Michael Lewis, does not have very good speed. I haven't mastered using subs on defense yet.

trio-sky-zoneTrio Sky Zone - The Trio Sky zone out of 3-4 over doesn't behave like a 'nano blitz' play but I always seem to get good pressure from this play.

Cover 3
- Sometimes, I'll use base cover 3 and blitz the left outside linebacker, Manny Lawson, to utilize his speed to pressure the quarterback. I'll user one of the linemen.

Running Plays

If I feel my opponent will be running I'll use Rush Outside, Strong Blitz, or Weak Blitz from 46 Normal formation. Sometimes, I'll spread the linemen. I'll user the FS but if I have a hunch that it might be a play action pass I'll user one of the linemen.

I just recently added Cover 1 from the Nickel 3-3-5 formation to my defensive audibles. This play seems to be a good run stopper against just about any running play. I only discovered its effectiveness after last night's game so the jury is still out.
cover-3Nickel Defense
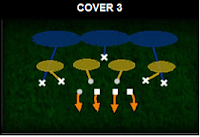
Whenever I know my opponent will be passing the ball my first choice is Cover 3 out of Nickel Odd split. This play has great coverage and seems to always bring good pressure. I often get a lot of sacks from Justin Smith (RE) out of this play. Because of this, I'll try to avoid usering him. I try to user the LE in case I need to cover the flats on the other side.

Goal Line defense
If my opponent comes out with 0 wide recievers I'll use one of the goal line blitzes and user the blitzing linebacker.

If my opponent brings out a 1 or 2 recievers I'll use a zone defense. I don't recall the name of the play but it's a cover 2 defense that also uses two hook zones and covers the flats. I'll use "Show Blitz" and will also turn on "Press". These two adjustments seem to do well defending against those short quick passes. I'll also put the LE in either QB Spy or QB contain to help prevent against the QB sneak. Lately, this hasn't been as effective as I would have liked it to be. The reason for this might be lack of awareness from the lineman. I may start usering the LE since most QBs like to run to the right. Before, I would user the RE.

Wednesday, December 16, 2009

Madden 10 game plan (Part 1 - Offense)

In Madden 10 this year, I've been playing online with the 49ers and have had pretty good success with the West Coast playbook most of the time, at least. To become familiar with this playbook I would go through each formation and pick one play after each down. After I have gone through each formation I would do it again until I found which plays I was comfortable with. Now that I'm more familiar with this playbook I have been able to devise a pattern of plays that I've been using each game. Here is a typical game plan that I may follow:

seattlePlay 1 - At the coin flip, I try to receive the ball first. Surprisingly, I always seem to get the ball first even if I lose the toss. For my first play of the game I always use a play called 'Seattle' which is out of the Singleback Bunch Swap formation. The slot receiver is usually open most of the time. If my opponent is playing zone, then I dump it to the HB which is running the blue route.

Play 2
- On my second play, go with 'Seattle' again. If I'm near or at the left hash marks and my opponent is running a zone defense I'll motion the outside receiver on the right and snap the ball before the receiver stops his motion. If the defense isn't covering the flats, the receiver will usually be open for a 10 yard gain.

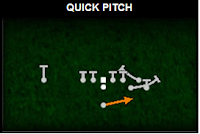
quick-pitchPlay 3 - While in Singleback Bunch Swap formation again I'll use the Quick Pitch play. This play sometimes results in a 5-6 yard gain.

Plays 4-7 - For the next 4-5 plays, I'll choose an outside run from each of the singleback formations as long as I'm still effective on the ground. It also depends on what type of defense I'm facing. If I'm facing a 4-3 defense I should be able to continue rushing outside. Against a 3-4 defense this will be less effective so I'll revert to 'Ask Madden' to see what works well.

After running the ball for about 4-5 times in a row, I'll throw in a play action pass from one of the singleback formations.

hb-insidePlay 8 - After the play action pass I'll choose another running play called HB Inside out of the Near Pro formation. Sometimes, I'm able to break through for a long gain with this play.

Quarter 2 Plays
The first quarter is usually about to end by the time I have finished my first drive. In the 2nd quarter, I'll usually refer to 'Ask Madden' to decide what to use.

slot-outsAt least once, if I'm anywhere in between the two red zones I'll run a play called Slot Outs from the Gun Spread Flex formation. Depending on how the defense is set up I might hot route one of the slot receivers to run a short route so I can throw a quick pass.

Most of the time, however, I usually get a good gain by throwing to the half back. I've been able to break the play wide open when I pass to the HB before he makes his cut. After he catches the ball the two receivers on the right are able to make blocks so the HB can break through.

Quarter 3 Plays
When I get the ball in the 2nd half I might go back and run the Seattle and Quick Pitch plays back to back to get my drive going. Then, I'll use 'Ask Madden' to help me decide on what to run.

Far Tight Twins
Near the end of the 3rd quarter I'll start running plays exclusively from the Far Tight Twins formation. This formation is good in that it's easy to tell if your opponent is in man or zone defense. I can usually drive all the way down the field with this formation. I'll wait till the latter half of the game to use this formation so my opponent has less time to catch on what plays I like to run. I will from time to time use Far tight Twins in the first half on 3rd down conversions or if I'm in the red zone.

quick-tossQuick Toss - This play should be used sparingly because it's quite effective until the opponent catches on. I'll use the Quick Toss if my opponent is playing zone although it also can be effective in man defense as well.

flats-meshAgainst Man Defense
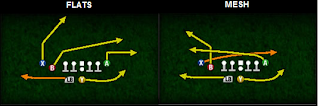
The Flats and Mesh plays work very well against man defense. If the defense puts a lot of pressure on the quarterback I will be able to run the Mesh play and dump the ball off to the tight end running the drag route. In the Flats play, the slot receiver is usually open for a good gain.

slant-hookRunning the slant Hook play against man can turn into a deadly play. To set this play up, I'll hot route the HB to run a drag route to the right side. He's usually open for a big gain.

I have the Quick Toss, flats, Mesh, and X Spot plays in my offensive audibles.

4th Quarter Plays
I'll continue to use plays from the Far Tight Twins formation but will also mix my plays in other formations depending on the situation.

Tuesday, December 15, 2009

Field Goal block glitch

Madden 10's 2nd title update was released a few weeks ago. Flat zone coverage seems to be fixed and pursuit angles for defensive players has improved. Overall this patch did a good job fixing some of the major issues but there will always be other lingering issues. Players always seem to find other ways to exploit the video game.

Last night, I faced a guy who had a method for blocking field goals. I scored on the beginning drive and he almost blocked my extra point attempt. Later in the 2nd quarter I attempted a field goal which was blocked. I reviewed the replay and he placed the guy that is usually in "safety" coverage and moved him in front of the standing linebacker. when the ball was snapped he switched control to that linebacker and jumped up and blocked the kick. I can't remember who he was using as the blocker but I thought it might have been Ted Ginn, Dolphins Wide Receiver, who has an 88 jump rating.

I think it's a bit cheesy to try to figure out a way to block field goals like this. The only way to counter is to not attempt any field goals and go for two point conversions. Case in point: In my game I was leading 7-3 late in the 4th quarter and it was 4th down with 4 yards to go on his 16 yard line. I could have attempted a field goal but didn't want to risk it being blocked so I went for it but failed the conversion. I eventually won the game. With about two minutes to go in the game, he was at mid field when I picked off his pass. He quit the game after that.


1 2 3 4 OT F
49ers 7 0 0 14 0 21
Dolphins 0 0 0 3 0 3

Statistics 49ers Dolphins
Rushing attempts for 19 17
Rushing yards for 183 87
Passing attempts for 14 26
Passing yards for 69 135
Punts 0 0
Field goals for 0 1
Long field goals (40+) for 0 0
Rushing touchdowns for 1 0
Passing touchdowns for 2 0
Returns touchdowns for 0 0
Defensive touchdowns for 0 0
Turnovers for 3 1
Interceptions for 1 2
Sacks for 1 0
Number of third downs 5 8
Third down conversions 2 3
No-huddle plays 0 1
Audibles called 7 5
Hot routes used 2 4
Shotgun plays 3 18
Blitzes 15 15
Time of possession 11:17 16:43

Monday, October 12, 2009

Madden 10 depth chart strategies

I've been thinking about reordering my wide receiver list in the depth chart to help create mismatches. I could also probably also use different packages such as WR Swap (swaps the wide receivers) or WR spell which I believe just brings in the backup receivers but these don't seem to give as much flexibility as making minor changes to the depth chart. Below are three things to keep in mind when setting up your wide receivers in the depth chart.

1. Create mismatches - Put your best wide receiver in the slot which almost always will have a big advantage over your opponent's third string corner back or linebacker.

2. Take advantage of your good blocking receivers - Another thing to think about when reordering your depth chart is to find out who your best blocking wide receiver is. Michael Crabtree of the 49ers, for example, has good blocking attributes so have him lined up in a position to block for your HB. You could also use motion but with the accelerated clock in this year's Madden 10, you might not always have time for motion.

3. Let your best receiver run your favorite routes - If you have a set of formations that you regularly use, study the routes you tend to use more often and make sure your best wide receiver runs these routes.

Defensive Assignments
Madden 10 has a new feature called Defensive Assignments which allows the defense to assign their best defenders to cover your best receivers regardless of where they line up in a formation. If your opponent is using defensive assignments you can't really take advantage of mismatches but since 'Defensive assignments' is a relatively new feature I wonder how often players are using it. While playing online, if your opponent pauses the game before it starts he might be setting up his defensive assignments you never know. If your opponent hasn't paused the game, then he obviously hasn't made any defensive assignments.

Another thing about defensive assignments is that these assignments only seem to take effect when the defense is playing in man to man coverage. In zone coverage each defender will cover his zone.

Monday, October 5, 2009

Madden 10 top 5 teams used online

I went to easportsworld to view the leader board to get an idea what type of teams these players are using. Last year, I think most would agree that the Cowboys and Patriots were the most popular online teams. Here are the top 5 used online teams for Madden 10:

1 - Chargers

Chargers don't really have a weakness on offense, do they?. They have a good quarterback, two good half backs, and a good TE.

2 - Eagles

The Eagles are probably the most widely use team overall but according to the leader board they were 2nd. Vick is a very popoular weapon of choice.

3 - Cowboys

The Cowboys were one of the elite teams last year but with the ratings changes this year there really isn't a dominating team. The Cowboys are still a favorite, however. They still have a great running game and solid defense.

4 - Raiders

Surprisingly, the Raiders always seem to be a popular team. Jamarcus Russell could be the most inaccurate quarterback in the game yet there are still a lot of Raiders players online.

5 - Titans

Chris Johnson is the fastest back in the game and quite possibly the best player in Madden this year. The Titans secondary is probably the best.

Friday, October 2, 2009

How to return kickoffs for TDs

kickoff-returnI have been having quite a bit of success returning kickoffs for touchdowns in Madden 10 with the 49ers. Allen Rossum has good speed as a kick returner so this might be one of the factors. Because of his speed, I always use one kick returner as opposed to two returners. I always choose middle kick return. There are 4 men lined up in front of the return man. Before the kickoff, I control one of the middle blockers. While the ball is in the air, I sprint the blocker towards the side the ball is being kicked to. I follow my blockers and if I get lucky, I'll find a hole. This method is usually only effective if the ball lands near the side of the field and not in between the hash marks.

On the kicking side, I've also been burned a few times with TD scoring kick returns. To help avoid TD returns I've been trying to kick the ball towards the middle of the field. While the ball is in the air, I'll maintain control of the kicker and just jog down the field so I don't interrupt the play.

Wednesday, September 30, 2009

Defensive Formations

Below is a list of defensive formations found in Madden 10 with some tips on when and when not to use them:

4-3 Normal

Advantages: A balanced run and pass defense. Good against inside runs and short to medium passing.
Disadvantages: Avoid using against four or more receiver sets. Blitzing Linebackers can leave slants and outside runs open.

4-3 Over/Under (Over and Under refers to having an extra LB on different sides of the line)

Advantages: Increased pass rush possibilities. Protect against inside and outside runs.
Disadvantages: Vulnerable to the passing game and fewer Linebackers in the middle could mean fewer tacklers if the HB gets through.

3-4 Normal

Advantages: A balanced run and pass defense. Defends outside runs and flat passes.
Disadvantages: Softer pass rush, but more blitz variety with extra Linebackers. Vulnerable to multiple receiver sets.

3-4 Over/Under

Advantages: Increased pass rush with linebacker at the line.
Disadvantages: Fewer Linebackers defending the short passes. Vulnerable to multiple receiver sets.

3-4 Solid (Both outside Linebackers crowd the line.)

Advantages: Increased pass rush opportunities and disguised blitzing. Stuff the run with increased penetration.
Disadvantages: Vulnerable to quick passes if outside Linebackers blitz. Avoid against multiple receiver sets.

3-4 Even (Outside Linebackers crowd the line and middle Linebackers tighten up.)

Advantages: Balanced run stoppage for inside and outside runs.
Disadvantages: Tighter formation could be vulnerable to the pass.

3-4 Stack (Resembles a 4-3 in alignment.)

Advantages: A 4-3 look for your excellent Linebackers. Variation in pass rushing for fast outside Linebackers.
Disadvantages: Avoid using against heavy passing situations.

3-4 Predator (Linebacker is lined up on the line of scrimmage in a three-point stance)

Advantages: Increased pass rush with linebacker at the line.
Disadvantages: Vulnerable to quick passes if outside Linebackers blitz.

4-4

Advantages: Run stoppage with 8 men in the box (around line of scrimmage).
Disadvantages: Potential to give up the big play, both through the air and on the ground

46 Normal

Advantages: Similar to 4-3 but safety provides extra run stopping support. Pressuring defense.
Disadvantages: Vulnerable to deep passes with just one safety back. Avoid using against heavy passing situations and multiple receiver sets.

46 Bear

Advantages:
Combines the 46 Normal and 4-3 Over defenses. Increased pressure along the line for stronger run defense and pressure.
Disadvantages: Weak pass defense. Avoid using against multiple receiver sets.

Nickel Normal

Advantages: An additional defensive back helps protect against the pass. Be sure the "nickel back" is lined up against the slot receiver. Optimum against 3 WR sets.
Disadvantages: Losing a linebacker means losing a good tackler.

Nickel Strong

Advantages: Increased safety help on the strong side. Helps provide additional coverage on a formation where there are more receivers and/or tight ends are on one side.
Disadvantages: Similar to the standard nickel. Also the safety shifted over could leave the other side open, especially if there are backs on pass patterns.

Nickel 1-5-5/1-5-5 Prowl

Advantages: Five Linebackers help defend against a run and five defensive backs help defend the pass. Allows for some blitzing variation.
Disadvantages: Can be a weak run defense if your Linebackers focus on coverage.

Nickel 2-4-5

Advantages: Added Linebackers help defend against an unexpected run. In the 3-4 playbook because of the team’s typical linebacker skill.
Disadvantages: Need to increase pass rush with linebacker pressure.

Nickel 3-3-5

Advantages: An added linebacker to defend the run or short passing.
Disadvantages: Need to increase pass rush with linebacker pressure.

Nickel Odd Split

Advantages: Good against the pass and the extra DB provides speed from coverage and the pass rush
Disadvantages: Could be vulnerable against run.

Dime Normal

Advantages: Six defensive backs to counter the passing game. Use against four or more wide receiver sets.
Disadvantages: Weak against an unexpected run.

Dime Flat

Advantages: Defenders are tighter and closer to the line to protect against run or short passing. Good for end zone defense.
Disadvantages: Weaker against deep passing.

Quarters Normal

Advantages: Seven defensive backs as a pass prevent defense.
Disadvantages: Easy to run against.

Quarters 3 Deep

Advantages: Three deep Safeties to protect against the deep ball. Use in long yardage situations.
Disadvantages: Easy to run against.

Quarters Combo

Advantages: Protects against the deep ball with three deep Safeties.
Disadvantages: Easy to run against.

Dollar Normal

Advantages: Eight players focused on stopping the pass. Use in certain passing situations (long yardage) or even in the red zone to crowd the end zone.
Disadvantages: You have a lot of bad tacklers on the field if your opponent runs the ball!

Wednesday, September 16, 2009

Madden 10 Slot Cross

slot-cross

The Slot Cross play seems to have a very good success rate. All you do is hit the slot receiver coming across the middle which will always results in a big gain if completed. The route will usually work in man coverage. In Cover 2 zone, you can hit the receiver between defenders. In cover 3 zone defense, you can throw the ball as soon as the receiver gets past the defender in the middle of the field. If a blitz is coming you can dump the ball off to your half back who is running a blue route.

Against the CPU this play seems to work just about every time. Against an online opponent, you may want to use it sparingly.


Friday, September 4, 2009

Top 5 offensive lines in Madden 10

A good running game starts with a good offensive line that will open up holes for you. A lineman with good strength (STR), run block strength (RBS), and run block footwork (RBF) attributes are key to being able to move your opponents out of the way for your running back. Acceleration (ACC) is also important because this determines how quickly the linemen get off the line to block.

Last year, I used the Colts in online games and I'm doing the same this year but I'm having second thoughts because my running game stinks. Here are some results of my last two games:

Rushing attempts for 13
Rushing yards for 40
Average yards per carry 3.07

Rushing attempts for 5
Rushing yards for 9
Average yards per carry 1.8

If you combine the (STR, RBF, and RBS) attributes of the Colt's line and average them out you get a value of 86. This is quite low compared to the top five offensive lines:

1. Eagles 92
2. Giants 91
3. Cowboys 91
4. Vikings 90
5. Titans 90

Not surprisingly, all of these top teams have excellent running backs.

I tend to perform better online when I'm controlling a good quarterback. This is why I usually prefer to use the Colts. I played a couple games with the Cardinals and didn't fare too well. I passed for a lot of yardage but couldn't run the ball. The Cardinals offensive line also has a low rating of 85.

Maybe I should start using the Eagles or Titans like everyone else!

Thursday, September 3, 2009

Stopping Wildcat in Madden 10


When Madden 10 was first released I kept getting burned online with the Wildcat. I finally found a formation that does a good job at stopping the Wildcat every time...so far. Just use any base formation that says 'QB Contain'.

Wednesday, September 2, 2009

Hit Stick in Madden 10

melvin-bullitt
I played an online game last night and was able to force a fumble with my hit stick during a kickoff. Unfortunately, I lost the "fight for the fumble". Nevertheless, this allowed me to understand which players I might want to control during a kickoff and during a game.

If I understand correctly, the player's POW (hit power) attribute determines the success of the possibility of a fumble. I was running Melvin Bullitt when I used the hit stick. I went to check his (POW) attribute and it was 51. I was expecting he would have a higher (POW) value because of the my success but maybe anything over 50 is good.

From now on, during kickoffs, I'm going to kick towards the right area of the field and then take control of Melvin Bullitt.

For those who use the Colts here are a list of players with high POW attributes:

Foster DT, 80
Session ROLB, 77
Freeney RE, 74
Bullitt FS, 51

Tuesday, September 1, 2009

How to throw a Hail Mary in Madden

I played an online game last night that I should have never won. I was down 13-0 in the 4th quarter and came back to win in the final seconds. With the ball on the 23 yard line and 1:26 left in the 4th quarter I ran the WR Double Pass from the Singleback Y-Trips formation in the Arizona playbook.


I "passed" the ball to Reggie Wayne as a lateral on the right side of the field and then he threw the ball across the field to Joseph Addai who made some spin moves and jukes to make it into the end zone.

Unfortunately, EA cut the beginning portion of the play so all you see is Addai catching the ball (greatness Score 2563):


"This site is not endorsed by or affiliated with Electronic Arts, or its licensors. Trademarks are the property of their respective owners. Game content and materials copyright Electronic Arts Inc. and its licensors. All Rights Reserved."


I was then lucky enough to recover the onside kick. On first down I ran the Hail Mary which turned into an incompletion. then, on the last play of the game I ran the Hail Mary again and my receiver was wide open. My opponent must have mistakenly made some adjustments before the snap which caused everyone to blitz rather than cover.

Even though I got lucky this time, there's a few things that I tried to do on the last play that helped its success ratio.

Hail Mary:

1. I tried to stay in the pocket as much as possible. If the QB drops back too much, it will turn into longer, inaccurate pass.

2. On PS3 use the L2 button throw the ball farther with a better arch. This button seems to give you a better throw on deep passes.

3. I haven't been able to master the pump fake but doing this may help draw the defense in before throwing the bomb.

Score Breakdown:

Below are the stats of last night's game. As you can see, I had no success running the ball. Take a look at the time of possession! I only had the ball for 3 minutes.

On defense, I used a lot of blitzes mainly to help stop the run.

                    1    2    3    4   OT    F
Colts 0 0 0 14 0 14
Dolphins 0 3 0 10 0 13

Statistics Colts Dolphins
Rushing attempts for 7 19
Rushing yards for -1 35
Passing attempts for 12 13
Passing yards for 179 103
Punts 2 1
Field goals for 0 2
Long field goals (40+) for 0 0
Rushing touchdowns for 0 1
Passing touchdowns for 2 0
Returns touchdowns for 0 0
Defensive touchdowns for 0 0
Turnovers for 1 1
Interceptions for 1 1
Sacks for 1 0
Number of third downs 4 7
Third down conversions 1 4
No-huddle plays 1 0
Audibles called 1 6
Hot routes used 0 11
Shotgun plays 7 5
Blitzes 19 7
Time of possession 3:08 16:52

Madden 10

Thursday, August 27, 2009

Madden attributes

Here is a list of Madden attribute abbreviations and an explanation for each attribute:

(OVR) Overall - The overall rating for the player.
(SPD) Speed - How fast the player can run.
(ACC) Acceleration - How fast a player reaches full speed.
(STR) Strength - The player's strength, which affects his ability to break tackles.
(AGI) Agility - The player's agility, enhancing his ability to switch directions.
(AWR) Awareness - A player's ability to react and adjust.
(CTH) Catching - How well the player can catch. A higher rating means fewer drops.
(CAR) Carrying - How well the player holds onto the football. A higher rating means the less chance of a fumble.
(THP) Throw Power - How far a player can throw the ball.
(THA) Throw Accuracy - How accurate a player throws. New attributes for Madden 10 are THA (Short) - accuracy on short passes, THA (Mid) accuracy on medium passes, THA (Deep) - accuracy on deep passes.
(PAC) Determines the effectiveness of play action for QB.
(RUN) Accuracy when throwing on the run.
(KPW) Kick Power - A kicker's power.
(KAC) Kick Accuracy - A kicker's accuracy.
(RBK) Run Block - How well a player run blocks.
(PBK) Pass Block - How well a player pass blocks.
(TAK) Tackle - A player's ability to tackle.
(JMP) Jumping - The player's ability to jump.
(RET) Return - Skill of the player as a punt or kick returner.
(INJ) Injury - The likelihood of an injury.
(STA) Stamina - The player's stamina level.
(TGH) Toughness - A players ability to recover from injuries.
(TRK) Trucking - Player's ability to run over a defender attempting a tackle.
(ELU) Elusiveness - Likely the ability to escape tackles (or perhaps sacks). This is a key statistic for running backs, receivers, and quarterbacks.
(BCV) Ball Carrier Vision - Ability to spot the open field.
(SFA) Stiff Arm - Player's ability with the stiff arm maneuver.
(SPM) Spin Move - Player's ability with the spin maneuver.
(JKM) Juke Move - Player's ability with the juke move.
(IBK) Impact Blocking - Blockers ability to make a leveling.
(RBK-STR) Run block strength.
(RBK-FT) Run block footwork.
(PBK-STR) Pass block strength.
(PBK-FT) Pass block footwork.
(POW) Hit Power - The strength of the player's hit, which can determine the success of a tackle or the possibility of a fumble.
(FIN) Finesse Moves - Similar to power moves but it's the ability to spin or swim around blocks.
(BKS) Block Shedding - How well the player can shed a block.
(PUR) Pursuit - Skill in finding and pursuing the ball carrier--likely laterally.
(PRC) Play Recognition.
(MAN) Man Coverage - Skill of the defender in man coverage.
(ZONE) Zone Coverage - Skill of the defender in zone coverage.
(SPCTH) Spectacular Catch - A player's ability to make a spectacular catch.
(CIT) Catch in Traffic - How well the player can catch the ball and maintain possession in tight coverage.
(RTE) Route Running Rating - How well the player runs the play's passing route.
(POW) Hit Power - The strength of the player's hit, which can determine the success of a tackle or the possibility of a fumble.
(PRESS) Press Rating - Ability of defender in press coverage.
(RELEASE) Release Rating - Ability of receiver to release from press coverage.